2D Rendering - 8 - Smile For the 2D Camera
 Download the source code for this post
Greetings. My quest to convince you that XNA isn’t the be all and end all continues.
In my previous post I talked about using a 2D camera to correct aspect ratio in your games.
I’m going to continue on the 2D camera theme, as once you’ve used one in your game, they can be used for all sorts of funky effects, such as panning, scaling, shaking, making cups of Tea etc. etc.
XNA 2D Camera Project
The sample code provided for this tutorial demonstrates translating, scaling, rotating, and, for a bit of fun, a camera shake effect. The embedded video below shows it in action.
Matrix Madness
Our 2D camera is implemented by means of Matrix Transformations. Again, we won’t get too hung up on matrices in this tutorial. All you need to know, is that a transformation matrix can be used to translate (aka move), rotate and scale vertices in an efficient manner.
In my previous Aspect Ratio Tutorial I made use of a Projection Matrix, to ensure that the square that we had defined in normalised device coordinate (NDC) space is rendered correctly. We will still be using this projection matrix, but it will be combined with our translation matrix.
Do not fret. All of this sounds pretty complicated, but the heavy lifting is performed by the good old OrthographicCamera class. This class deals with combining our transformation and projection matrices for us.
Shaders
The shaders are very similar to the ones I’ve used in my previous tutorials, so I won’t go over all of that malarkey again. I just want to mention that I have renamed the matrix passed to the vertex shader, so that it reflects that it is now holding a combined projection and transformation matrix.
attribute vec4 a_position;
attribute vec2 a_texCoord;
uniform mat4 u_projTrans;  // <--- It be renamed, it be (imagine Cornish accent)
varying vec2 v_texCoord;
void main() {
	gl_Position = u_projTrans * a_position;
	v_texCoord =  a_texCoord;
}
World Space
The image below outlines what I call the world space that our 2d camera is looking at. We have a 1024 x 768 quad, with a texture applied to it. Without applying any scaling, our camera is the same size as our display - 640 x 480. The camera’s origin is at it’s center (0,0), which is centered to our world space. Note that in the following images, the aqua-blue rectangle represents our camera.
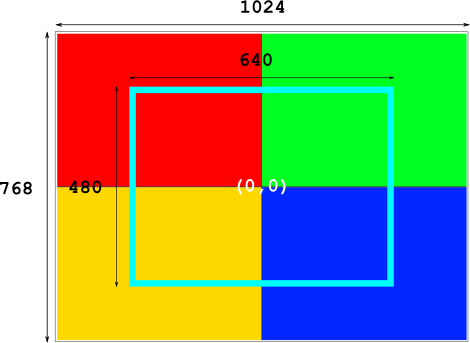
The relevant code to achieve this can be seen below:
private static final float WORLD_WIDTH = 1024;
private static final float WORLD_HEIGHT = 768;

@Override
public void create () {

	float halfWidth = WORLD_WIDTH / 2;
	float halfHeight = WORLD_HEIGHT / 2;

	mesh = new Mesh(true, 4, 0,
			new VertexAttribute(Usage.Position, 2, "a_position"),
			new VertexAttribute(Usage.TextureCoordinates, 2, "a_texCoord")
	);

	float[] vertices = {
			-halfWidth, -halfHeight,	// quad bottom left
			0.0f, 1.0f, 			// texture bottom left
			halfWidth, -halfHeight, 	// quad bottom right
			1f, 1.0f, 	    		// texture bottom right
			-halfWidth, halfHeight,		// quad top left
			0.0f, 0.0f, 			// texture top left
			halfWidth, halfHeight,		// quad top right
			1.0f, 0.0f 			// texture top-right
	};

	mesh.setVertices(vertices);
	createTexture();
	createMeshShader();
	font = new BitmapFont();
	spriteBatch = new SpriteBatch();
}

@Override
public void resize(int width, int height) {
	super.resize(width, height);
	camera = new OrthographicCamera(width, height);
}
Scaling
Scaling is probably the hardest thing to understand, so, before we look at the source code, I’ll work through a couple of examples, to make it clear what is going on.
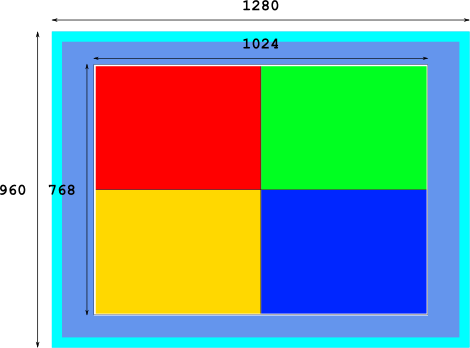
The diagram below shows what happens when we apply a scale factor of 2. The camera’s size is now 1280 x 960 i.e. (640 x 2) x (480 x 2), so becomes bigger than our world space. Therefore, increasing the scale factor results in zooming out.
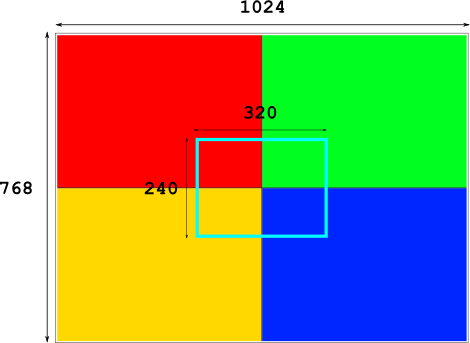
The next image shows what happens when we apply a scale factor of 0.5. The camera’s size is now 320 x 240 i.e. (640 x 0.5) x (480 x 0.5), so becomes smaller than our display. Therefore, decreasing the scale factor results in zooming in.
That wasn’t too bad, was it? Fax me if you disagree… Okay, onto the source code.
The first thing we do is define some zooming limits and the required duration to zoom from fully in to fully out (and vice versa). Here we have decided on 0.75 of a second to be our desired zoom time.
private static final float MAX_ZOOM_IN = 0.05f;
private static final float MAX_ZOOM_OUT = 4f;
private static final float SPEED_ZOOM_SECONDS = .75f;
In resize(), we set the zoom factor halfway between the min and max zoom, so that we are slightly zoomed out. We also initialise an elapsedZoom member, which keeps tabs on how much zoom time has elapsed so far. We initialise elapsedZoom with the zoom speed divided by 2, so that it lines up with the zoom level we just set. i.e. We have set our zoom half way, so our elapsed zoom time needs to reflect that.
@Override
public void resize(int width, int height) {
	super.resize(width, height);
	camera = new OrthographicCamera(width, height);
	camera.zoom = (MAX_ZOOM_OUT - MAX_ZOOM_IN) / 2;	elapsedZoom = SPEED_ZOOM_SECONDS / 2;	currentRotation = 0;
}
In our zoomOut() method, the first thing we do is update our elapsedZoom time, by adding delta to it.
delta is the amount of time, in seconds, which has passed since the last frame. It will be a fractional value. For example, if you are running at 60fps, it will have the value 1/60 = 0.0166. We also use clamp(), to ensure that value stays somewhere between 0 and SPEED_ZOOM_SECONDS.
Finally we use elapsedZoom within lerp(), to provide us with a smooth linear interpolation between MAX_ZOOM_IN and MAX_ZOOM_OUT. We pass elapsedZoom / SPEED_ZOOM_SECONDS as the last parameter, so that we get a value between 0..1, which lerp() expects.
If you didn’t understand any of that last paragraph, then you need to revisit my earlier post (see juicy details), where I discuss Linear Interpolation in depth. Alternatively, for more excitement, go watch some paint dry.
private void zoomOut(float delta){
	elapsedZoom  = MathUtils.clamp(elapsedZoom + delta, 0, SPEED_ZOOM_SECONDS);
	camera.zoom = MathUtils.lerp(MAX_ZOOM_IN, MAX_ZOOM_OUT, elapsedZoom / SPEED_ZOOM_SECONDS);
}
zoomIn() is very similar, so I won’t bore you with the details. Download the source code if you are interested.
Rotating
For rotation, we define a constant to drive how many seconds a full 360 degree rotation should take. We also declare a member variable, which will help us keep tabs on the camera’s current angle. This is something that we can’t easily get back from the camera class. The information is in there, but not conveniently held in degrees, so this gets around that small problem.
private static final float SPEED_ROTATE_SECONDS = 1.5f;
private float currentRotation = 0;
We use currentRotation to help us reset the camera’s rotation. To reset the camera to 0 degrees, we can simply subtract currentRotation. Think about it…
We have a single rotate() method, which encapsulates rotating the camera and keeping tabs of the current rotation angle. Note that the degrees specified here are relative to the angle that the camera is already at.
private void rotate(float degrees){
	camera.rotate(degrees,0,0,1);
	currentRotation += degrees;
}
rotateRight() receives delta, in the same way as our zoom methods, which is used to ensure that the rotation takes as long as we decided earlier.
private void rotateRight(float delta){
	float deltaRotation = 360 * delta / SPEED_ROTATE_SECONDS;
	rotate(deltaRotation);
}
Again, I won’t bore you with rotateLeft(), as it is very similar.
Translating
For translation, we define how many pixels per second we should pan the camera by. We have defined that it should take one second to move 800 pixels across, up, or down.
private static final float SPEED_TRANSLATE_SECONDS = 800f;
canPan() is a method which gets called to see if we can indeed pan, given the camera’s current zoom factor. That is, if the camera is larger than our world, then we can’t pan.
Confession time: This is not exactly bullet proof. If you zoom, rotate and translate, things can get out of hand. What do you expect for free? The moon on a stick?
private boolean canPan(){
	if(camera.zoom > WORLD_WIDTH / camera.viewportWidth){
		return false;
	}
       return true;
}
panRight(), again, takes delta as a parameter, so that we can ensure that it takes one second to move 800 pixels. The camera’s translate(x, y) method, also takes relative values. That is, it will move relative to its current position.
We instruct it to move SPEED_TRANSLATE_SECONDS * delta on the x axis. To make it clear, how it will move 800 pixels per second, imagine if we simply passed delta as the x parameter. In this case, it would move a pixel every second. So, if we multiply delta by 800, it will move 800 pixels every second.
Once we have moved the camera, we ensure that it has not exceeded the world boundaries, by calculating the min and max x values and then using clamp() to keep the camera’s x value within that range.
Let’s work through an example based on the image shown earlier, where the camera is zoomed in with a value of 0.5.

So, in this case, the camera’s origin (the center point) is constrained to a value between -352 and 352, which guarantees that it won’t move past the white border which surrounds our texture. Note that 352 + 352 + 320 = 1024, which happens to be the width of our world.
private void panRight(float delta){
	if(canPan()){
		camera.translate(SPEED_TRANSLATE_SECONDS * delta, 0);
		float scaledViewportWidth = camera.viewportWidth * camera.zoom;
	        float maxX = WORLD_WIDTH / 2 - scaledViewportWidth /2;
	        float minX = -maxX;
	        camera.position.x = MathUtils.clamp(camera.position.x, minX, maxX);
	}
}
panLeft(), panUp() and panDown() are again very similar. Blah de blah…
Rendering
The rendering code changes are trivial. We simply need to communicate our combined projection/transformation matrix to the shader, and do the usual stuff that we have in the previous tutorials. libGDX’s Camera class has a handy combined matrix member to help us with this.
In our render() method, you can see where I grab delta time from, on line 3. This is very similar to the delta time that is passed through to the XNA framework’s update() method via the GameTime parameter.
On line 5, we call camera.update(). This ensures that all the values we have modified (zoom, translation, rotation etc.) are applied internally, and that its combined projection/translation matrix is calculated accordingly.
Finally, on line 16, we pass the camera’s combined matrix to the shader, and let it rip!
@Override
public void render () {
	float delta = Gdx.graphics.getDeltaTime(); // 3.
	handleKeys(delta);
	camera.update();  // 5.

	Gdx.gl.glClearColor(colCornflowerBlue.r, colCornflowerBlue.g, colCornflowerBlue.b, colCornflowerBlue.a);
	Gdx.gl.glClear(GL20.GL_COLOR_BUFFER_BIT);

	Gdx.gl20.glActiveTexture(GL20.GL_TEXTURE0);
	texture.setFilter(TextureFilter.Linear, TextureFilter.Linear);
	texture.bind();

	shader.begin();
	shader.setUniformi("u_texture", 0);
	shader.setUniformMatrix("u_projTrans", camera.combined); // 16.
	mesh.render(shader, GL20.GL_TRIANGLE_STRIP);
	shader.end();

	showMessage();
}
Shake, Rattle and Roll
If you download the source for this tutorial, you will see that I have also implemented a camera shake method. I know, I’m too kind…
Our camera shake builds on top of all of what we discussed above. Basically, we define how long a shake should take (in seconds), and, during that period, we choose random translation and rotation values every frame. When the shaking time is up, we reset the camera to its state prior to it shaking. Let’s take a look at the code:
First we define our constants. MAX_SHAKE_X and MAX_SHAKE_Y specify the maximum number of pixels to translate on each axis. Note that these values can be negated (randomly), so, for instance, we may translate up to 10 pixels to the left or right.
MAX_SHAKE_ROTATION determines the maximum number of degrees that we want to rotate, relative to the current rotation. We also negate this randomly, which allows us to rotate either clockwise or anti-clockwise.
MAX_SHAKE_TIME determines the duration of the shaking. Half a second in our case.
private static float MAX_SHAKE_X = 10;
private static float MAX_SHAKE_Y = 10;
private static float MAX_SHAKE_ROTATION = 4;
private static final float MAX_SHAKE_TIME = 0.5f;
Next we define some member variables. shakeTime is the current time remaining when shaking is active. Setting this to any value > 0 triggers a shake.
storedPosition and storedRotation are used to store the camera’s state, prior to a shake, so that we can restore the camera’s state when the shaking has finished.
private float shakeTime;
private Vector3 storedPosition;
private float storedRotation;
Let’s take a look at the actual shaking code.
If shakeTime is zero, then we have nothing to do. Otherwise, we deduct delta from the time remaining. If we hit zero, or below, it’s time to stop shaking, so we restore the camera state and we are done until the next time a shake is initiated.
if (shakeTime == 0)
  return;

shakeTime -= delta;

if (shakeTime <= 0)
{
    shakeTime = 0;
    camera.position.x = storedPosition.x;
    camera.position.y = storedPosition.y;
    camera.position.z = storedPosition.z;
    rotateCamera(-currentRotation + storedRotation);
    return;
}
If shakeTime is > 0, then we are shaking. The first thing we do is calculate a rotation and translation modifier. These will equate to either 1 or -1, depending on a random number. We can then use them to negate the translation or rotation, as I mentioned earlier.
int posModifier = 1;
int rotModifier = 1;
if (MathUtils.random(10) >= 5)
    posModifier = -1;
if (MathUtils.random(10) >= 5)
    rotModifier = -1;
Next we calculate the random x and y translation amounts, and the rotation amount. We then multiply those numbers accordingly with the random direction modifiers, which we calculated in the previous step.
float posXAmount = MathUtils.random(MAX_SHAKE_X) * posModifier;
float posYAmount = MathUtils.random(MAX_SHAKE_Y) * posModifier;
float rotAmount = MathUtils.random(MAX_SHAKE_ROTATION) * rotModifier;
Finally, we translate and rotate our camera by the random values.
camera.position.x = storedPosition.x + posXAmount;
camera.position.y = storedPosition.y + posYAmount;
rotateCamera(rotAmount);
Pretty neat eh?
Show/Hide juicy details
Congratulations. You have read all of the details. Here's a Slack logo:
Coming up next
We’ll take a look at viewports, which will compliment our camera work just nicely. So they will, they will so (imagine Irish accent)
JK