2D Rendering - 7 - Aspect Ratio
 Download the source code for this post
G’day ladies and gentlemen, and welcome back. In this post I’m going to cover aspect ratio. If you are anything like me, you will probably be used to working on a game using XNA, where you stick with a fixed screen resolution - possibly 720p - and you draw sprites and other things directly onto the screen using x and y pixel coordinates.
If this is the case, then you haven’t had to worry about aspect ratio. I want to take the time to explain it properly, as I feel that it often gets skirted over and people just make do with what they can get working, without truly understanding what’s going on under the hood.
If you’ve been following my posts, you might have gotten the idea that you can’t work directly with pixel coordinates using libGDX. This is not correct. I have merely been introducing some new concepts, which will ultimately give you more options going forward. In fact, in this post, we will start working towards being able to render things in ye olde XNA fashion.
Let’s push dirty old XNA to one side and get started.
Wot no square?
So, in a previous tutorial I demonstrated rendering a quad. The thing is, when I defined the vertices, I gave the quad a size of 1 x 1 - i.e. a square. However, when the code is executed, it is rendered as a rectangle, as shown below.

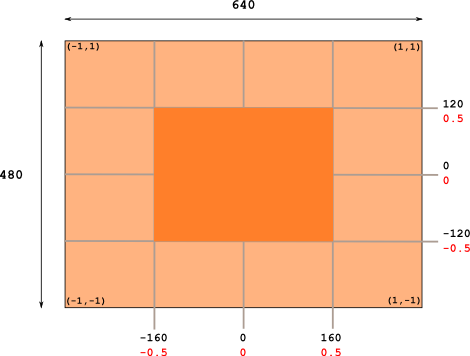
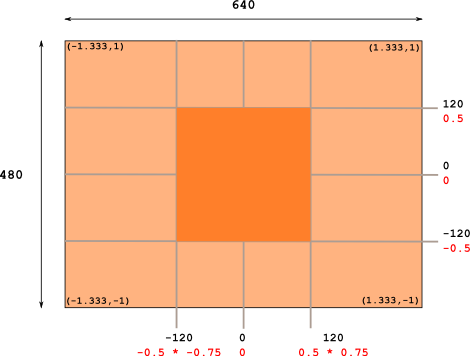
What madness is going on here? Well, it’s all related to something called Aspect Ratio. Basically, OpenGL’s Normalised Device Coordinate (NDC) system represents a square of size 2 x 2 (-1…1 x -1…1), but is used to address any size/shape screen.
We have been working with a 640 x 480 window resolution, which ain’t square.
The image below shows the NDC mapping over our window. On the axes, you can see the pixel coordinates in black and the NDC coordinates in red. So, you should be able to see that we end up drawing a rectangle, which is 320 pixels wide and 240 pixels high.
So, how can we fix this?
Orthographic Camera
What we need to do is indicate that our Viewport is not square, but rectangular. We can make use of libGDX’s OrthographicCamera to help us with this.
OrthographicCamera is what you will use when rendering 2D games with libGDX. In this post we are going to be using it for its Projection Matrix. Now, I don’t want to get hung up on the details of Linear Algebra and Matrix operations in this post. We are basically using the Camera’s projection matrix to project our vertices to a different place on the viewport than where they are currently ending up in the previous image.
For example, when we have a vertex at position (.5f, .5f), in our case, we don’t want .5f on the x axis to actually mean .5f in NDC.
If this doesn’t make complete sense to you, do not fret. We’ll get into some coding examples to make it crystal clear.
Calculating Aspect Ratio
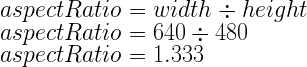
Calculating aspect ratio is trivial. You basically find out which is bigger - the height or width of the screen - and divide the smaller of the two into the larger.
For example, in our case, our screen’s resolution is 640 x 480. So our aspect ratio is:
Show/Hide Optional Nerdy Aspect Ratio Details...
Okay, we just calculated an aspect ratio of 1.3, but how does this relate to the aspect ratios that we are used to seeing banded about, such as 4:3, 16:9?

Coding the Aspect Ratio
The first thing we do is create a Camera to make use of the aspect ratio.
public void resize(int width, int height) {
	super.resize(width, height);
	float aspectRatio = (float) width / (float) height;
	camera = new OrthographicCamera(2 * aspectRatio, 2);}
The signature of the OrthographicCamera constructor is OrthographicCamera(width, height). You can see from the code above that I am only applying the aspect ratio to the width. this is because, in our case, it is the width that is larger than the height (640 x 480).
What we are saying here, is that the width of the screen is now 2.666 (2 x our aspect ration) and the height is still 2.
Modifying the Vertex Shader
Next we need to make a small change to our vertex shader, so that it can apply our camera’s projection matrix. We add a new uniform variable u_proj and multiply that with the position attributes.
attribute vec4 a_position;
attribute vec4 a_color;
uniform mat4 u_proj;varying vec4 v_color;
void main() {
	gl_Position = u_proj * a_position;	v_color = a_color;
}
Hooking in the Camera
Finally, we need to inform our vertex shader of our camera’s projection matrix. Note that the call to camera.update() isn’t needed in this particular case, but it will be in future tutorials, so I’ve included it for completeness.
public void render() {
	Gdx.gl.glClearColor(0, 0, 0, 1);
	Gdx.gl.glClear(GL20.GL_COLOR_BUFFER_BIT);

	camera.update();
	shader.begin();
	shader.setUniformMatrix("u_proj", camera.projection);
  quadMesh.render(shader, GL20.GL_TRIANGLE_STRIP, 0, 4);
	shader.end();
The Result
When you execute the new code, you will see that we now have an actual square!
Erm, What?
Okay, I’m going to provide a bit more detail on what just happened, as it can be quite hard to grasp at first. Let’s nail this sucker.
In its simplest terms, what we have done is make an adjustment to each vertex before they are rendered, to bring them in line with the shape of our screen. The adjustment has been made by means of multiplication. On the x axis, we have multiplied them by 0.75 and the y axis, by 1.
Where did I get 0.75 and 1 from? Well, libGDX uses the aspect ratio to calculate these numbers as follows:
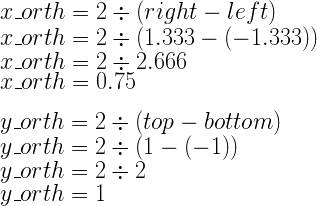
So, for example, if we have a vertex at position (0.5,0.5), it will be projected to (0.5 * .75, 0.5 *1), which is (0.375, 0.5).
Now that you have this knowledge, the following image, hopefully clarifies exactly how we got the square.
Using Pixel Coordinates
Now that we have a camera, we can use whatever coordinate system we wish. Wash those NDC coordinates right outta you hair, as I’m going to demonstrate using pixel coordinates.
All we have to do is redefine our camera. Note that we have no need to calculate the aspect ratio this time, as we are setting the camera directly with the width and height of our screen (640 x 480), which is the value that the libGDX framework will pass through to the resize() method.
public void resize(int width, int height) {
	super.resize(width, height);
	camera = new OrthographicCamera(width, height);}
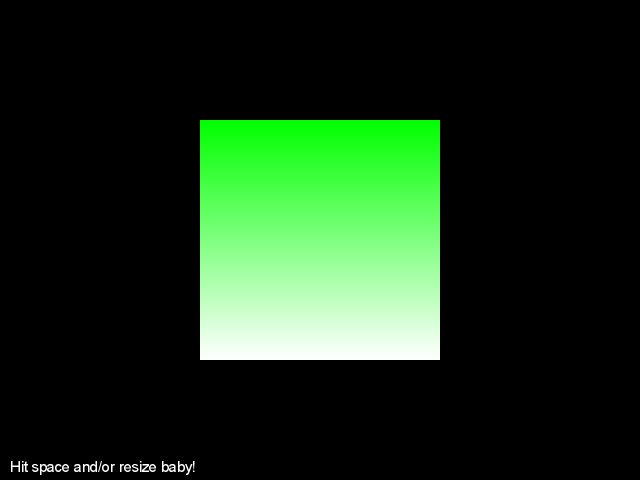
And finally, use pixel coordinates for our vertex position attributes:
// Top green to bottom white
quadMesh2.setVertices(new float[] {
	-120f, -120f, 0, Color.toFloatBits(255, 255, 255, 255), // white bottom left
	120f, -120f, 0, Color.toFloatBits(255, 255, 255, 255), 	// white bottom right
	-120f, 120f, 0,  Color.toFloatBits(0, 255, 0, 255),	// green top left
	120f, 120f, 0,  Color.toFloatBits(0, 255, 0, 255) });	// green top right
Now when we execute our code, we see the same size square as before, but in Green.
See this post’s source repo for how to deal with aspect ratio when the height is bigger than the width.
Coming up next
We’ll do a bit more on cameras, as they are great for games, even 2d ones.
JK