2D Rendering - 3 - Triangles With Colour
 Download the source code for this post
Hello again, and welcome to the next installment of my series on moving from XNA to libGDX.
Before I go any further, I just want to say that the aim of the first few posts is to cover what I think are the essential basics of libGDX. This will then give me a platform to demonstrate implementing XNA type functionality in a libGDX way. So bare with me for the next few weeks and I am sure that you will see what I mean. Besides, all of the OpenGL fancy stuff is good to know.
So in my previous post we ended up writing a couple of shaders and a Java program, where the net result was the ability to render a white triangle on a black background. This time around, we will add some colour to that sexy triangle, which involves us encoding a different kind of vertex data in those pesky arrays that OpenGL insists on working with.
Color Attributes
Previously, we only included positional information in our vertex data. This time we are going to embed some colour data in there too. Before we can do this, we need to instruct OpenGL to expect this new format when we create our Mesh instance:
triangleMesh = new Mesh(true, 3, 0,
	new VertexAttribute(Usage.Position, 2, "a_position"),
	new VertexAttribute(Usage.ColorUnpacked, 4, "a_color")
);
The above code snippet does exactly this. Here we are passing multiple VertexAttributes to the Mesh constructor. Line 3 adds the new color attribute, named a_color, which instructs OpenGL to expect four color components : Red, Green, Blue and Alpha.
Vertex Data
We then change our vertex array to encode some colour data for each vertex in there (gawd bless the Queen):
triangleMesh.setVertices(new float[] {
	0, 0.5f, 1, 0, 0, 1, 		// red top vertex
	0.5f, -0.5f, 1, 1, 1, 1,  	// white bottom right vertex
	-0.5f, -0.5f, 0, 0, 1, 1 	// blue bottom left vertex
});
So, taking the first line of data as an example, the first vertex holds the following data:
x: 0y: 0.5red: 1green: 0blue: 0alpha: 1
Remember, the red value of 1 is the XNA equivalent of 255, as explained in my previous article.
Vertex Shader
Now that we have a new colour attribute we need to modify our vertex shader to make use of it. Here is our updated vertex shader:
attribute vec4 a_position;
attribute vec4 a_color;
varying vec4 v_color;
void main() {
  gl_Position = a_position;
  v_color = a_color;
}
The first thing to note, is that we no longer have the uniform variable u_color. We don’t need this any more, as we won’t leave it to our Java program to set the triangle’s colour. Instead, we are passing the colours along with each vertex.
Line 2 introduces a new attribute: a_color. Like before, it is named the same as in our VertexAttribute constructor, which means that it will receive the color attribute that we encoded earlier in our Java program.
Line 3 introduces a new variable v_color, of the type varying. This is how we pass the colour attribute data onto our fragment shader, so that it can colour in those pretty pixels. We will discuss the significance of using the varying type a bit further down in this post.
Fragment Shader
Finally, we change the fragment shader to make use of v_color, which is passed from our vertex shader.
varying vec4 v_color;
void main() {
  gl_FragColor = v_color;
}
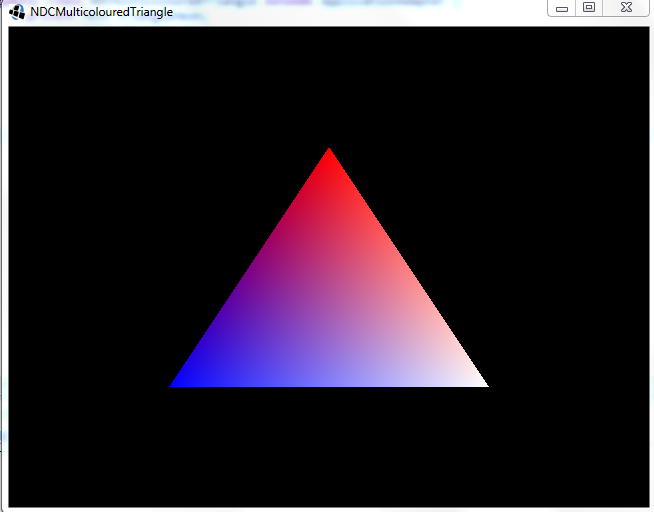
When we execute the application, you will see the following sight:
 .
.
I can hear your gasps from here. A glorious sight indeed. So, what happened? Let me introduce you to the varying type…
Varying Type
With varying type variables, the vertex shader uses Linear Interpolation and passes a value based on a position between vertices to the fragment shader. As clear as mud? Thought so. That’s why it is best explained by example. Here goes…
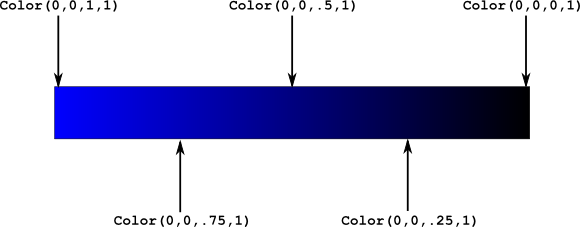
The image below depicts a line where the left vertex has the colour blue - Color(0,0,1,1) and the right has the colour black - Color(0,0,0,1).
At the left edge, we have 100% blue - Color(0, 0, 1, 1). As we move further right, the blue colour component decreases (linearly). For example, at a quarter of the way across, the colour is Color(0, 0, .75f, 1). At the middle, the colour is Color(0, 0, .5f, 1). Finally when we get to the right hand side, the colour is Color(0, 0, 0, 1).
 .
.
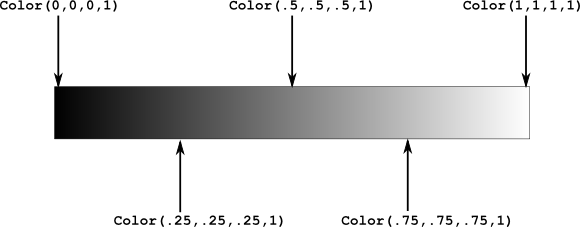
The next image depicts a line which has the colour black at the left vertex and the colour white - Color(1,1,1,1) at the right vertex.
This time, if we work from right to left. At the right edge, we have 100% white - e.g. Color(1,1,1,1). As we move further left, our white colour decreases linearly. Note that white involves three colour components - red, green and blue, - so they are all affected. If we move across a quarter of the way, the colour is Color(.75f, .75f, .75f, 1). At the middle, it is Color(.5f, .5f, .5f, 1). Finally, when we reach the left hand side, the colour value is Color(0, 0, 0, 1).
 .
.
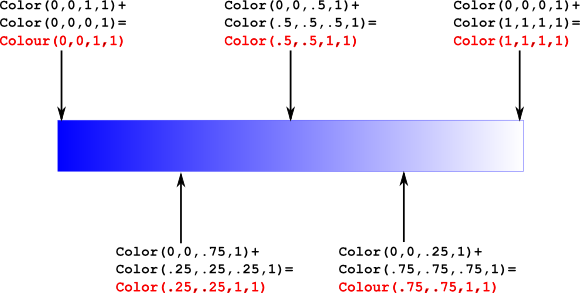
When we combine the two, we end up with the line blended, as shown in the image below. So, we now have a representation of what happens with interpolation between a blue vertex on the left and a white vertex on the right. (Note that alpha isn’t being blended and stays a constant value of 1)
 .
.
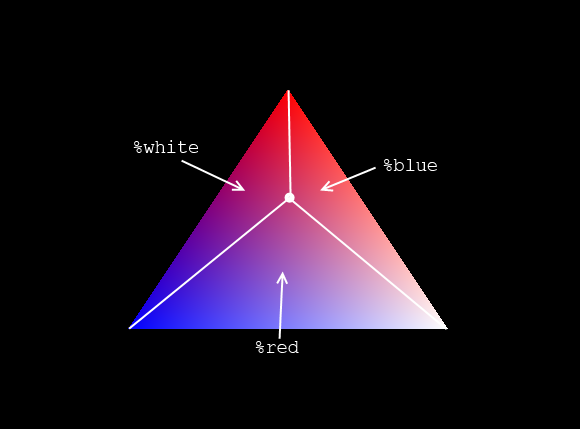
Okay, so we had a triangle, but the principle is still the same. At any one point in the triangle, we can form three sub triangles by drawing a line from the point to each vertex, as depicted below. The area of each triangle, along with one of the vertices, determines how strong each colour is for a chosen point (e.g. the white dot in the middle below). This interpolation method is known as Barycentric Interpolation, which uses the Barycentric coordinate system.
 .
.
So, this is basically what is happening with the varying values coming in from the vertex shader. You don’t need to know the finer details above. Just think of it as the vertex shader helping the fragment shader to plug in the gaps when rendering meshes.
Show/Hide juicy details
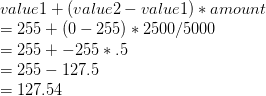
If you don’t know much about linear interpolation, let me introduce the XNA Lerp() function (we’ll look at the libGDX version later). TheLerp function has the following signature:
public static float Lerp (
         float value1,
         float value2,
         float amount
)

value1 and value2 represent the two values that you want interpolate between, and amount is a value between 0..1, which represents how far you are between value1 and value2. Given that input, the function returns a value somewhere between value1 and value2.
This function is really handy when you want to move from one value to another within a certain time frame. For example, you might want to fade a colour to black and have it take place in even intervals within, say, two seconds. Another example, might me that you want to animate a creature blinking, and have it take one second. The uses are endless.
As a real example, say we have the colour red, and we want to fade it to black in 5 seconds, we could do it with the following XNA code.
Color col = Color.Red;
float elapsed = 0;
protected override void Update(GameTime gameTime)
    {
        elapsed += (float) gameTime.ElapsedGameTime.TotalMilliseconds;
        float amount = MathHelper.Clamp(elapsed / 5000, 0, 1);

        byte redComponent = (byte) MathHelper.Lerp(255, 0, amount);

        col.R = redComponent ;
    }
elapsed is summing the total time. Each time Update() is called, the elapsed time since the previous update is accumulated.
The following line is normalising the elapsed time to a number between 0..1 and clamping it to make sure that it stays within that range. We need to clamp, as elapsed is accumulating forever, so we will get values greater than 1, when it exceeds 5000.
float amount = MathHelper.Clamp(elapsed / 5000, 0, 1);
value1 (255), value2 (0) and amount (our normalised elapsed time) into the Lerp() function and assign the resulting value to our redComponent variable.
byte redComponent = (byte) MathHelper.Lerp(255, 0, amount);
col.R = redComponent ;
Coming up Next
Just a wee bit more on triangle related stuff and then we can start getting stuck into even more interesting stuff.
JK